一、简介
一般来说我们通常使用Nginx进行七层协议的转发代理,如http、https、ws、wss等。最常见的就是镜像网页的代理或者静态页面的代理,本文对此不做过多说明,相信大家看到此文一定对nginx有一定的基础了解。下面我们开始进行正文部分。本文示例为转发SSH为例,其他如MySQL、Redis等类似。至于UDP协议还请各位看官自行测试。
二、二进制安装Nginx
2.1 官网下载nginx源码
https://nginx.org/en/download.html
2.2 下载必要依赖
centos
yum install -y gcc gcc-c++ pcre pcre-devel zlib zlib-devel penssl openssl-devel openssl

ubuntu
apt-get install -y libpcre3 libpcre3-dev zlib1g-dev libssl-dev build-essential
2.3 源码编译安装
注意需要安装stream模块
./configure  --prefix=/usr/local/nginx --with-stream   --with-http_ssl_module --with-http_flv_module --with-http_stub_status_module --with-http_gzip_static_module --with-pcre

make && make install
2.4 修改配置文件
cd /usr/local/nginx/conf/

vi nginx.conf
注意修改nginx.conf
stream {     # 此处注意是stream,还有一个模块是http的是7层http转发
    server {
        listen 2222;
        resolver 114.114.114.114 223.5.5.5 valid=3600s;
        proxy_connect_timeout 1h;
        proxy_timeout 1h;
        proxy_pass xxx.xxx.com:22;
    }
}
2.5 启动Nginx
cd /usr/local/nginx/sbin

./nginx -g "daemon on;"
三、使用Docker容器Nginx
3.1 拉取nginx镜像
docker pull nginx:1.25.3
3.2 编写nginx.conf
user  nginx;
worker_processes  auto;

error_log  /var/log/nginx/error.log notice;
pid        /var/run/nginx.pid;

events {
    worker_connections  1024;
}

http {  # 此处是http的内容
    include       /etc/nginx/mime.types;
    default_type  application/octet-stream;

    log_format  main  '$remote_addr - $remote_user [$time_local] "$request" '
                      '$status $body_bytes_sent "$http_referer" '
                      '"$http_user_agent" "$http_x_forwarded_for"';

    access_log  /var/log/nginx/access.log  main;

    sendfile        on;

    keepalive_timeout  65;

    include /etc/nginx/conf.d/*.conf;
}
stream {     # 此处注意是stream是新加的,默认没有此
    include /etc/nginx/stream.conf.d/*.conf;
}
3.3 本地分别创建stream.conf和conf文件夹
文件夹名称可自己命名
其中conf中正常防止http的配置文件,如果没有文件夹内为空即可,如果有以.conf为文件名后缀。
stream.conf文件夹内为四层TCP协议配置文件,如以下内容,文件后缀同样为.conf
# ssh.conf  # 文件名称

server {
        listen 2222;
        resolver 114.114.114.114 223.5.5.5 valid=3600s;
        proxy_connect_timeout 1h;
        proxy_timeout 1h;
        proxy_pass xxx.xxx.com:22;
}
3.4 启动容器
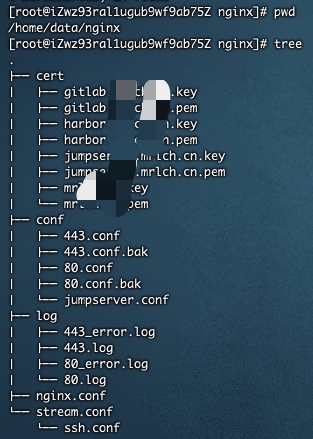
下图为我的目录结构。
- cert文件夹为https的证书文件
- conf为七层http的配置文件
- log为nginx日志
- stream.conf为本次新增的TCP透传文件夹目录
- nginx.conf为nginx总配置文件,需要替换容器内的nginx.conf。因为容器内的nginx.conf没有配置4层转发。

这里以上图的目录结构为例,编写的启动命令,如您的目录结构或路径与之不同可以自行判断更改
docker run -dit --restart=always --net=host --name=nginx -v /home/data/nginx/cert:/etc/nginx/cert -v /home/data/nginx/conf:/etc/nginx/conf.d -v /home/data/nginx/stream.conf:/etc/nginx/stream.conf.d -v /home/data/nginx/log:/tmp -v /home/data/nginx/nginx.conf:/etc/nginx/nginx.conf nginx:1.25.3
四、其他透传方案
4.1 使用socat透传(容器)
docker run -dit --restart=always --publish 53:53 alpine/socat tcp-listen:53,fork,reuseaddr tcp-connect:114.114.114.114:53
4.2 使用socat透传(非容器)
yum install -y socat

socat tcp-listen:53,fork,reuseaddr tcp-connect:114.114.114.114:53 &
